이전글
2020/10/21 - [Python] - [Python] Flask 살펴보기
[Python] Flask 살펴보기
Flask? Flask는 파이썬에서 사용가능한 웹프레임워크 중 하나입니다. 개발사에 따르면 '마이크로'프레임 워크이며 이 마이크로는 기능이 적다는 뜻이 아니라, 최소한의 기능만 포함하여 사용자가
hidden-loca.tistory.com
[Tensorflow] Tensorflowlite를 이용한 Image classification model maker
다른 게시물들을 통해 딥러닝 모델들을 저장하는 방법에대해 알아보았습니다. 2020/09/23 - [Python/Deep Learning] - [Keras] 모델 저장하기 2020/09/24 - [Python/Deep Learning] - [Keras] 모델 불러오기 저장..
hidden-loca.tistory.com
2020/10/20 - [Python/Deep Learning] - [Tensorflow] Image classification model maker예측하기.
[Tensorflow] Image classification model maker예측하기.
tflite-model-make 설치와 모델생성. 더보기 2020/10/08 - [Python/Deep Learning] - [Tensorflow] Tensorflowlite를 이용한 Image classification model maker 이전 글을 통해 아주 쉽게 예측 모델을 생성해 내었..
hidden-loca.tistory.com
0. REST API란?
일단 API는 여기저기서 들어봤을 겁니다. google API, NAVER API, 기상청 API 등등
API를 신청하면 개인 키를 발급받고 키를 이용해 API를 호출하면 각각의 정보를 얻을수 있습니다.
REST(Representational State Transfer)는 다음과 같아야 합니다.
- 인터페이스 일관성 : 일관적인 인터페이스로 분리되어야 한다.
- 무상태(Stateless): 각 요청 간 클라이언트의 콘텍스트가 서버에 저장되어서는 안 된다.
- 캐시 처리 가능(Cacheable): WWW에서와 같이 클라이언트는 응답을 캐싱할 수 있어야 한다.
- 잘 관리되는 캐싱은 클라이언트-서버 간 상호작용을 부분적으로 또는 완전하게 제거하여 scalability와 성능을 향상시킨다.
- 계층화(Layered System): 클라이언트는 보통 대상 서버에 직접 연결되었는지, 또는 중간 서버를 통해 연결되었는지를 알 수 없다. 중간 서버는 로드 밸런싱 기능이나 공유 캐시 기능을 제공함으로써 시스템 규모 확장성을 향상시키는 데 유용하다.
- Code on demand (optional) - 자바 애플릿이나 자바스크립트의 제공을 통해 서버가 클라이언트가 실행시킬 수 있는 로직을 전송하여 기능을 확장시킬 수 있다.
- 클라이언트/서버 구조 : 아키텍처를 단순화시키고 작은 단위로 분리(decouple)함으로써 클라이언트-서버의 각 파트가 독립적으로 개선될 수 있도록 해준다.
-wiki-
즉 위에서 언급한 google API, NAVER API같은 것들은 이미 RESTFUL(REST를 잘 적용한)한 API로 배포되고 있습니다.
더욱 자세한 정보는 맨 아래 참고 사이트를 봐주세요,
1. API 정의
API는 request 를 받아 response 한다. 사진을 보내 추측결과를 받아내야 하므로 POST 방식 + file로 request 받아 Json 방식으로 response 하는 API를 만들어보겠습니다.
2. Flask 기본 서버
from flask import Flask
app = Flask(__name__)


@app.route('/')
def hello():
    return 'Hello World!'

if __name__ == '__main__':
	app.run()
Flask에서 기본적으로 제공하는 예시 입니다. http://loacalhost:5000으로 접속하면 Hello World!가 출력됩니다.
3. 변형
from flask import Flask
app = Flask(__name__)


@app.route('/')
def hello():
    return 'Hello World!'

@app.route('/API', methods=['POST','GET'])
def pred():

    return jsonify({"1st":"test", "2nd":"Post"})

if __name__ == '__main__':
	app.run()
새로운 pred 메소드를 만들고 API라는 주소를 주었습니다. 또한 return을 Json형식으로 반환하도록 하였습니다.
4. 모델 및 예측 값 불러오기.
이전 글을 참고하시면 tflite 모델 생성 및 모델을 불러와 예측하는 방법까지 알 수 있습니다.
import tensorflow as tf
from tensorflow.keras.preprocessing.image import ImageDataGenerator
import numpy as np
from operator import itemgetter
import os

## Seperate model load##
sep_root_path = "D:\\python\\apple\\models\\sep\\"
sep_label_path =sep_root_path + 'labels.txt'

files = open(sep_label_path, "r",encoding="UTF-8")
labels = files.readlines()
sep_labels =[]

for label in labels:
    sep_labels.append(label.strip('\n'))
files.close

sep_interpreter = tf.lite.Interpreter(model_path=sep_root_path+"model.tflite")
sep_interpreter.allocate_tensors()

def seperate():

    # Get input and output tensors.
    input_details = sep_interpreter.get_input_details()
    output_details = sep_interpreter.get_output_details()
    datagen = ImageDataGenerator(rescale=1. / 255)
    test_dir = 'uploaded'
    test_generator = datagen.flow_from_directory(
        test_dir,
        target_size=(224, 224),
        shuffle=False,
        class_mode='categorical',
        batch_size=1)

    input_data = np.array(test_generator[0][0],dtype=np.float32)

    sep_interpreter.set_tensor(input_details[0]['index'], input_data)

    sep_interpreter.invoke()

    output_data = sep_interpreter.get_tensor(output_details[0]['index'])
    #print(*output_data)

    print_data =[]
    list_print_data =[]

    for index, value in enumerate(*output_data):
        list_print_data.append([index,value])

    print_data = sorted(list_print_data, key=itemgetter(1), reverse=True)

    #print(print_data)

    result = []
    for i in range(len(*output_data)):
        result.append(sep_labels[print_data[i][0]])

    return str(result[0])
위의 코드는 이미지를 입력받아 잎인지, 과실인지 분류하는 모델의 코드입니다. seperate이전에 모델을 불러와 load하고 seperate 실행마다 이미지를 읽어 이미지를 분류합니다.
분류한 모델은 output_data로 출력되며 output_data를 정렬하여 1,2,3, 순위를 전부 확인할 수 있도록 수정할 수 있습니다.
매 예측마다 같은 모델을 사용하여 예측을 하게 되는데, API의 경우 많은 요청이 있을 수 있기에 불러오는 과정을 미리 준비하는게 유리 합니다.
또한 datageneretor를 사용 하면서 폴더를 통째로 불러오는 flow_from_folder를 사용했는데 마찬가지로 사용자가 많아질 경우 여러개의 파일을 읽어 잘못된 결과를 도출할 수 있으므로 파일이름까지 한번에 넣어 한장을 불러 예측하거나, 파일을 저장하지 않고 읽어내어 사용하는 과정이 필요합니다.
특히 읽어내는데 시간이 걸리는 만큼 저장하는데도 시간이 오래걸리기에 가능하면 저장을 안하는쪽, 최소화 하는 쪽으로 가는것이 좋습니다.
5.request 받기, 이미지 저장,
다시 flask로 돌아와 봅시다.
app = Flask(__name__)

app.config['JSON_AS_ASCII'] = False # jsonify에서 한글사용
app.config['UPLOAD_FOLDER'] = 'uploaded\\image'

@app.route('/API', methods=['POST','GET'])
def pred():
    remo_credir()
    if request.method == 'POST':
        f = request.files['file']
        f.save(os.path.join(app.config['UPLOAD_FOLDER'], secure_filename(f.filename)))
        val1 = seprated()
        return jsonify({"1st":val1})
    if request.method == 'GET':
        return "get!"
request.files['file']을 통해서 POST형식으로 전해지는 file을 읽어올 수 있습니다.
if 문으로 POST, GET을 구분해 줄수 있게 하였으며 파일을 저장하여 읽어올수 있도록 구성 되어 있습니다.
#werkzeug.utils의 secure_filename은 파일 이름을 정리해 줍니다.
#secure_filename 예시
>>> secure_filename("My cool movie.mov")
    'My_cool_movie.mov'
>>> secure_filename("../../../etc/passwd")
    'etc_passwd'
>>> secure_filename(u'i contain cool \xfcml\xe4uts.txt')
    'i_contain_cool_umlauts.txt'
전체실행

아래와 같이 실행됩니다. http://127.0.0.1:5000/API, 또는 http://localhost:5000/API로 API가 실행되었습니다.
6. 확인
크롬 앱중, Advanced Rest Client를 이용하여 request를보내 확인하여 봅시다.
chrome.google.com/webstore/detail/advanced-rest-client/hgmloofddffdnphfgcellkdfbfbjeloo?hl=ko
Advanced REST client
The web developers helper program to create and test custom HTTP requests.
chrome.google.com
앱을 설취한뒤 실행하면 다음과 같은 창이 열립니다.
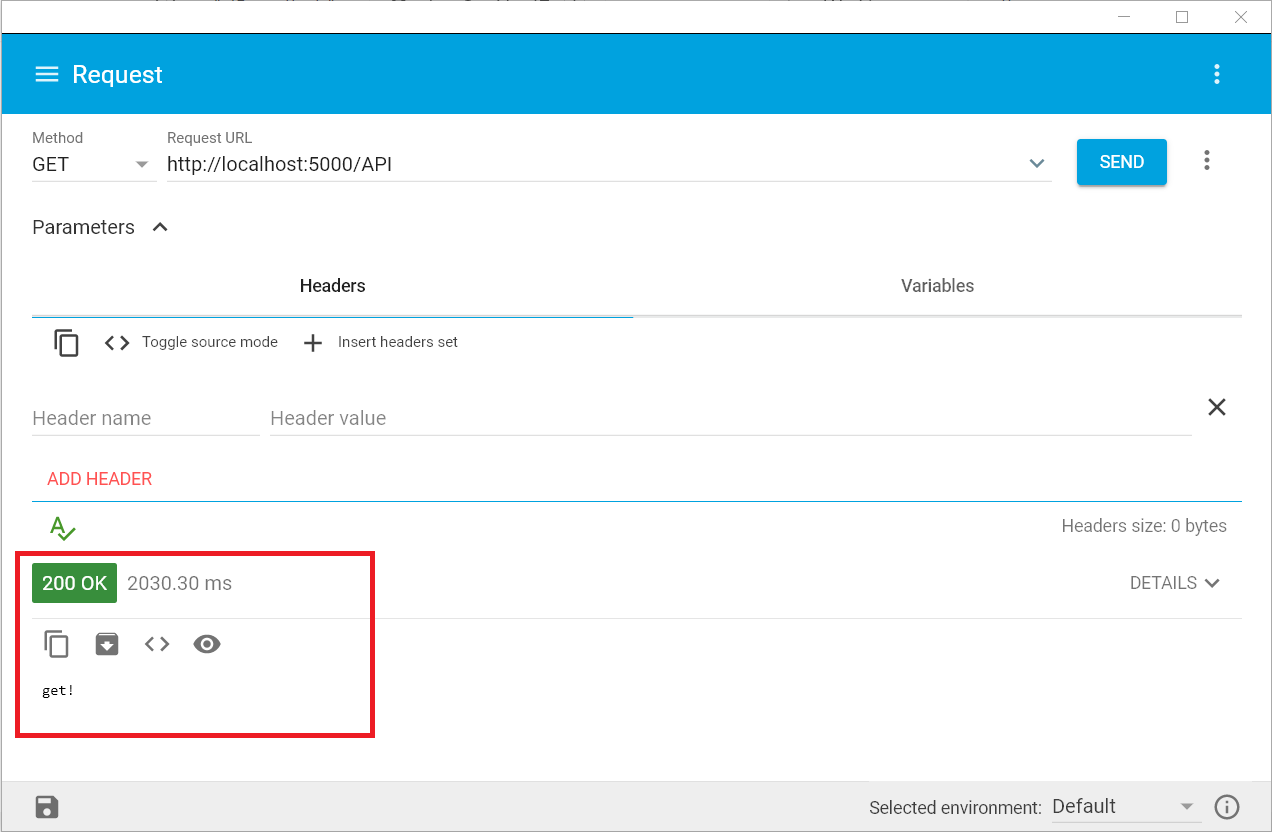
상단에 Method를 GET으로, URL을 http://localhost:5000/API로 실행하여 봅시다.
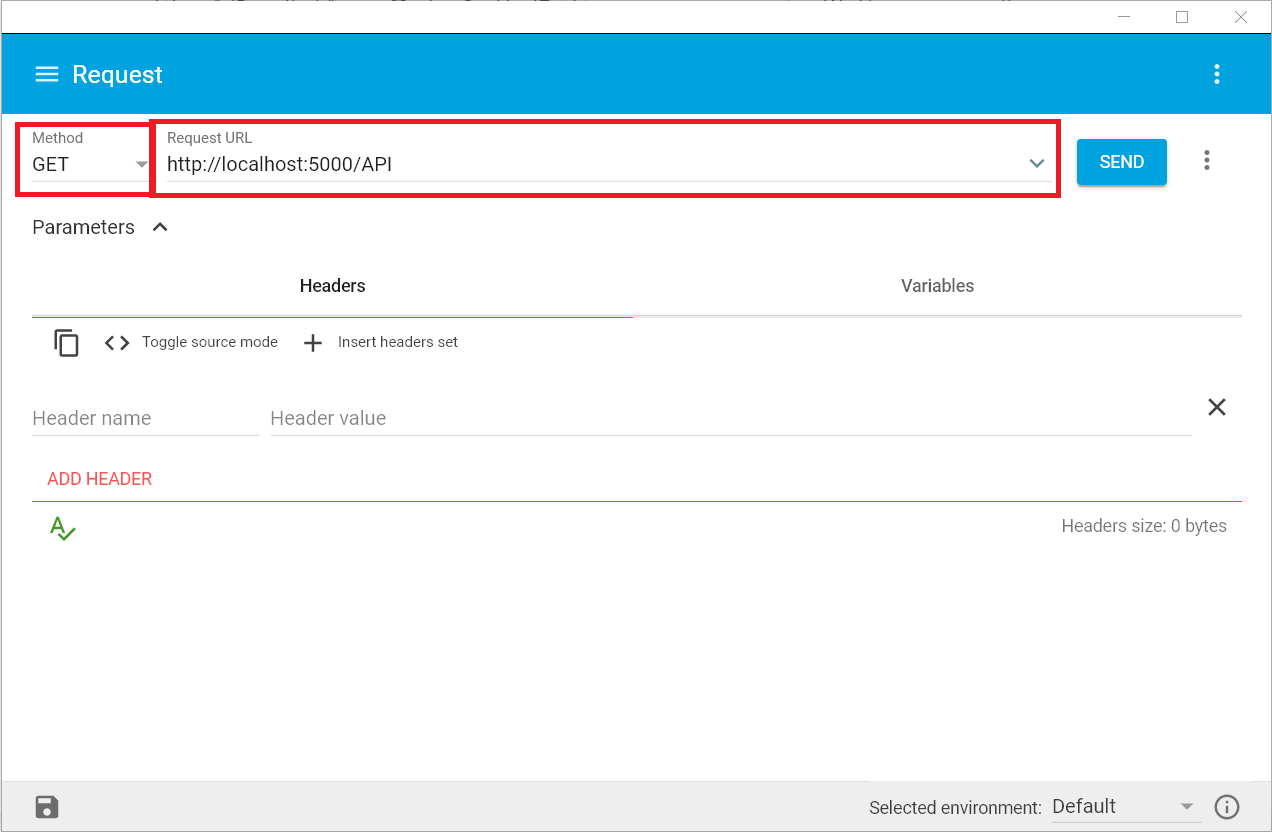
설정해둔 'get!' 이 리턴됩니다.
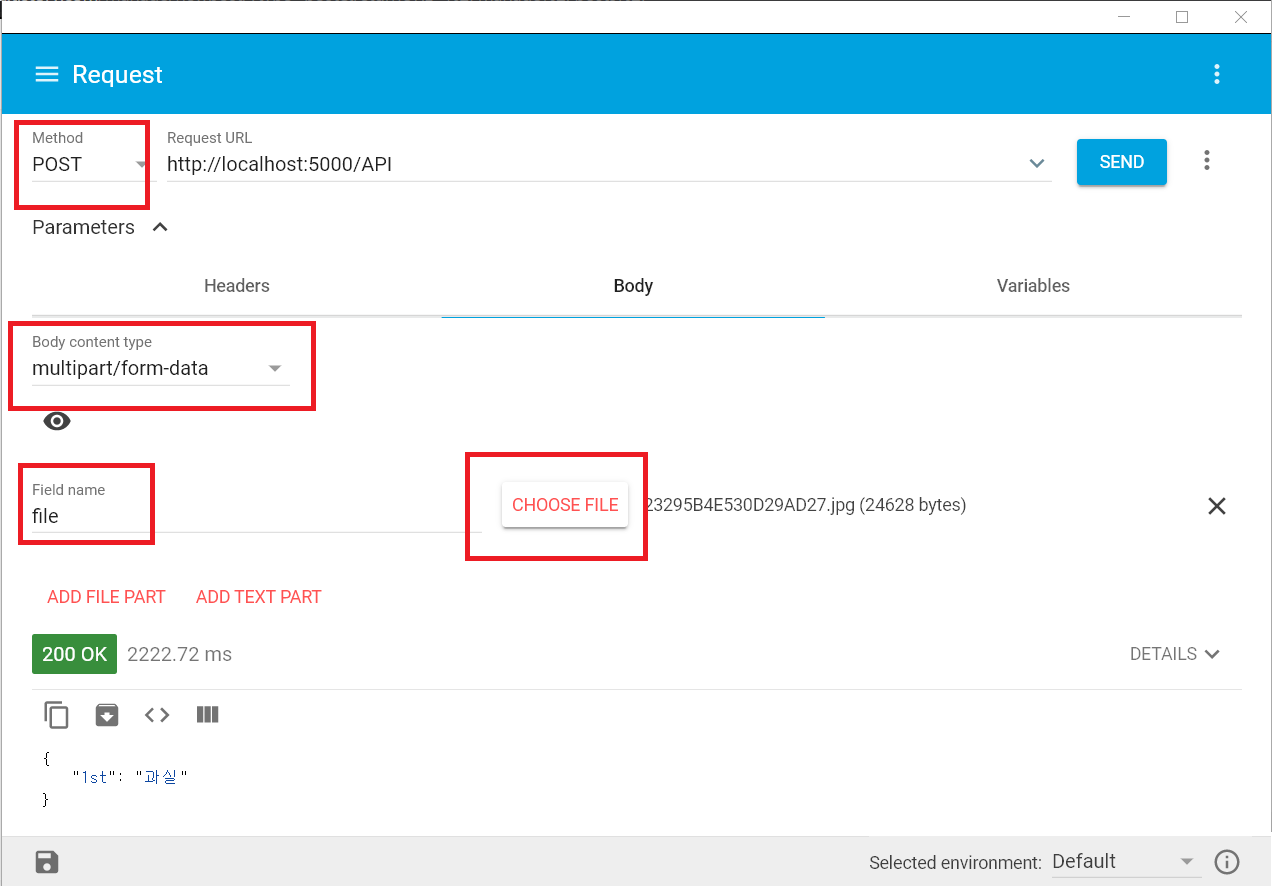
상단을 POST로 바꾸고 Body - Body content type을 multipart/form-data로
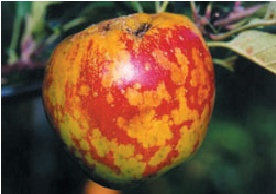
Field name에 file을 준뒤 적당한 사진을 하나 선택해 넣으면 파일이 과실인이 잎인지 json 형식으로 return한다.
전체 코드
import tensorflow as tf
from flask import Flask, request,jsonify
from werkzeug.utils import secure_filename
from tensorflow.keras.preprocessing.image import ImageDataGenerator
import numpy as np
from operator import itemgetter
import os


## Seperate model load##
sep_root_path = "C:\\flask\\models\\models\\sep\\"
sep_label_path = sep_root_path + 'labels.txt'

files = open(sep_label_path, "r", encoding="UTF-8")
labels = files.readlines()
sep_labels = []

for label in labels:
    sep_labels.append(label.strip('\n'))
files.close

sep_interpreter = tf.lite.Interpreter(model_path=sep_root_path + "model.tflite")
sep_interpreter.allocate_tensors()


def seperate():
    # Get input and output tensors.
    input_details = sep_interpreter.get_input_details()
    output_details = sep_interpreter.get_output_details()
    datagen = ImageDataGenerator(rescale=1. / 255)
    test_dir = 'uploaded'
    test_generator = datagen.flow_from_directory(
        test_dir,
        target_size=(224, 224),
        shuffle=False,
        class_mode='categorical',
        batch_size=1)

    input_data = np.array(test_generator[0][0], dtype=np.float32)

    sep_interpreter.set_tensor(input_details[0]['index'], input_data)

    sep_interpreter.invoke()

    output_data = sep_interpreter.get_tensor(output_details[0]['index'])
    # print(*output_data)

    print_data = []
    list_print_data = []

    for index, value in enumerate(*output_data):
        list_print_data.append([index, value])

    print_data = sorted(list_print_data, key=itemgetter(1), reverse=True)

    # print(print_data)

    result = []
    for i in range(len(*output_data)):
        result.append(sep_labels[print_data[i][0]])

    return str(result[0])


def remo_credir():
    try:
        import shutil
        shutil.rmtree('uploaded/image')
        print()
    except:
        pass

    try:
        os.mkdir('uploaded/image')
    except:
        pass

app = Flask(__name__)

app.config['JSON_AS_ASCII'] = False # jsonify에서 한글사용
app.config['UPLOAD_FOLDER'] = 'uploaded\\image' #경로설정

@app.route('/API', methods=['POST','GET'])
def pred():
    if request.method == 'POST':
        remo_credir()
        f = request.files['file']
        f.save(os.path.join(app.config['UPLOAD_FOLDER'], secure_filename(f.filename)))
        val1 = seperate()
        return jsonify({"1st":val1})
    if request.method == 'GET':
        return "get!"


if __name__ == '__main__':
    app.run()
참고 사이트
tutorials.pytorch.kr/intermediate/flask_rest_api_tutorial.html
Flask를 이용하여 Python에서 PyTorch를 REST API로 배포하기 — PyTorch Tutorials 1.6.0 documentation
Note Click here to download the full example code Flask를 이용하여 Python에서 PyTorch를 REST API로 배포하기 Author: Avinash Sajjanshetty번역: 박정환 이 튜토리얼에서는 Flask를 이용하여 PyTorch 모델을 배포하고 모델 추
tutorials.pytorch.kr
REST API 제대로 알고 사용하기 : TOAST Meetup
REST API 제대로 알고 사용하기
meetup.toast.com
'Back > Python' 카테고리의 다른 글
| [Python] OpenCV (0) | 2021.01.05 |
|---|---|
| [Python][Flask] Flask에서 cache 설정 (0) | 2020.11.03 |
| [Python][Anaconda3] Anaconda 설치(1) (0) | 2020.10.27 |
| [Python] Flask 살펴보기 (0) | 2020.10.21 |
| [Python] Selenium을 통한 웹 크롤링, 구글 이미지 검색, 다운로드 (0) | 2020.10.21 |


