2021.05.12 - [Python/Deep Learning] - [YOLOv4][Darknet] 빌드 및 예시
[YOLOv4][Darknet] 빌드 및 예시
0. 학습 환경. 나의 오랜 벗, 낡은 노트북 cpu : i3 - 7100 vga : 1050 4GB (아마도, 모바일) ram : 16G HDD, (Ubuntu 설치되어있는) Software UBUNTU 20.04 LTS CUDA : 11.0 cuDNN: 8.2 OPENCV: 4.40 Anaconda,..
hidden-loca.tistory.com
이전 글에서 Darknet을 빌드하고 시작합니다.
1.데이터 준비,
학습을 위해 데이터를 준비.
- 이미지 데이터
- 이미지데이터와 동일한 이름의 박스가 표시된 텍스트
- 학습설정이 들어간 cfg 파일
- 학습되는 class 이름이 들어간 obj.names 파일
- 모든 경로가 적혀있는 obj.data
1-1
YOLO 주제는 각자 선정하되 이번 예제에선 간단한게 숫자들과 한글 자음(ㄱ~ㅎ, 쌍자음 제외) + 모음(ㅏ) 으로 구성된 이미지셋을 구성하겠습니다.
즉 클래스는
1,2,3,4,5,6,7,8,9,0,가,나,다,라,마,바,사,아,자,차,카,타,파,하
총 24개이여,
우선 각 문자에 해당하는 작은 이미지(카드)를 만들고 배경에 이미지를 붙여 하나의 판을 만들어 이미지를 학습을 진행합니다.


1-2 카드 생성
import cv2
import numpy as np
from PIL import ImageFont, ImageDraw, Image
import os
opencv 와 pillow를 사용하여 이미지를 생성합니다. pillow를 사용하는 이유는 한글을 적기 위해서입니다.
이번 예제에선 label에 한글을 넣지만 실제 상황에선 label을 숫자, 혹은 영문으로 바꿔야 출력할때 label이 정상적으로 보입니다.
charset = list('가나다라마바사아자차카타파하')+[str(i) for i in list(range(0,10))]

#글자 카드 생성
def setupImage(word):
    font_size = 50
    font = ImageFont.truetype("./font/NotoSerifCJKkr-Black.otf",font_size)

    w = len(word) * font_size +100
    h = font_size*3
    #255 로 배경생성(높이, 폭, 채널) 색상값
    img = np.full((h, w, 3), (255, 255, 255), np.uint8)
    img = Image.fromarray(img)
    draw = ImageDraw.Draw(img)

    text = word
    len(text)
    draw.text((20, 20),  text, font=font, fill=(0, 0, 0))

    img = np.array(img)
    return img
charset이란 리스트에 원하는 문자들을 넣습니다.
폰트를 설정하고 단어를 받아 이미지로 만드는 함수를 선언합니다. numpy array로 return되어 집니다.
#가장자리 자르기 https://www.javaer101.com/ko/article/1052221.html

def cropImage(img):
    rsz_img = cv2.resize(img, None, fx=1.0, fy=1.0) # resize since image is huge
    gray = cv2.cvtColor(rsz_img, cv2.COLOR_BGR2GRAY) # convert to grayscale
    retval, thresh_gray = cv2.threshold(gray, thresh=100, maxval=255, type=cv2.THRESH_BINARY)

    # find where the signature is and make a cropped region
    points = np.argwhere(thresh_gray==0) # find where the black pixels are
    points = np.fliplr(points) # store them in x,y coordinates instead of row,col indices
    x, y, w, h = cv2.boundingRect(points) # create a rectangle around those points
    x, y, w, h = x-10, y-10, w+20, h+20 # make the box a little bigger
    crop = img[y:y+h, x:x+w] # create a cropped region of the gray image

    return crop
만들어진 이미지의 가장자리를 잘라 일정한 카드모양으로 만듭니다. 링크의 코드에서 여백 부분을 살짝 바꿔서 사용하였습니다.
#카드 생성
for word in charset:
    img = setupImage(word)
    card = cropImage(img)
    path = './card'
    if not os.path.isdir(path):
        os.makedirs(path)

    # cv2.imwrite(path +'/'+ word+'.jpg',card)
    card = Image.fromarray(card)
    card.save(path +'/'+ word+'.jpg','JPEG')
카드를 생성합니다. 각 카드는 각 단어를 파일이름으로 가지는 jpg 파일입니다.
1-3 board 및 라벨링.
import random as rd
from PIL import Image
import os
import numpy as np
# 카드를 불러와 담을 객체 class
class target():
def __init__(self,image):
self.image = Image.open(image)
self.location = (0,0)
self.reroll()
self.sizeCommit()
self.reLocated()
self.value = os.path.basename(image)
def reroll(self): #객체크기를 재 지정합니다.
print(self.image.size)
rn = rd.randrange(5,11)/10 +rd.randint(0,1)
rdsize = (int(self.image.size[0]*rn), int(self.image.size[1]*rn))
print(rdsize)
self.size = rdsize
def sizeCommit(self): #재지정한 크기를 적용합니다.
self.image = self.image.resize(self.size)
def getlocation(self): #위치와 사이즈를 반환합니다.
x = self.location[0]
y = self.location[1]
w = self.size[0]
h = self.size[1]
return (x,y,x+w,y+h)
def setup(self): #위치를 랜덤으로 정합니다.
x = rd.randint(0,1000)
y = rd.randint(0,1000)
self.location = (x,y)
return self.location
def reLocated(self): #위치를 확인하고 배경을 벗어나면 다시 위치를 정합니다.
self.setup()
while not self.checker():
print(self.setup())
def checker(self): #객체의 배경과 위치를 확인 합니다.
if self.location[0]+self.size[0] >1000 or self.location[1]+self.size[1] >1000:
return False
else:
return True
def show(self): #객체를 보여줍니다.
self.image.show()카드를 불러와 담을 class를 생성합니다.
크기와 위치가 랜덤으로 정해지며 위치를 검출하기 위해서 위치를 반환할 수 있도록 하였습니다.
#배경 생성
def backgroundSet():
    global img
    background_size=1000
    img = np.full((background_size, background_size, 3), (255, 255, 255), np.uint8)
    img = Image.fromarray(img)

path = './card'
cards = os.listdir('card') #정렬 없이 리스트에 담아 집니다.

def pathBuild(path,file):
    return os.path.join(path,file)
배경을 생성하는 함수입니다. 배경은 1000*1000size로 일괄적으로 설정하였습니다.
더불어 만들어 두었던 카드들을 리스트에 담아 준비해 둡니다.
카드가 켭치는지 확인하는 함수입니다. 겹치지 않을경우 0을 반환 겹치는 경우 넓이를 반환 합니다.
https://wonsang0514.tistory.com/38
두사각형의 겹치는 면적 구하기
문제 왼쪽 위 코너의 좌표 (0, 0), 오른쪽 아래 코너의 좌표 (w-1, h-1) 총 두 개의 좌표로 사각형을 표현한다고 하자. rect1 = [x1, y1, x2, y2], rect2 = [x3, y3, x4, y4] 두 개의 사각형의 겹치는 넓이는 구하..
wonsang0514.tistory.com
위 블로그의 코드를 사용하였습니다.
# 겹치는 넓이 구하는 알고리즘입니다. https://wonsang0514.tistory.com/38
# 겹치는 여부만 확인.
def georee(rect1,rect2):
    x1, y1 = rect1[0], rect1[1]
    x2, y2 = rect1[2], rect1[3]
    x3, y3 = rect2[0], rect2[1]
    x4, y4 = rect2[2], rect2[3]

    ## case1 오른쪽으로 벗어나 있는 경우

    if x2 < x3:
        return 0

    ## case2 왼쪽으로 벗어나 있는 경우
    if x1 > x4:
        return 0

    ## case3 위쪽으로 벗어나 있는 경우
    if  y2 < y3:
        return 0

    ## case4 아래쪽으로 벗어나 있는 경우
    if  y1 > y4:
        return 0
    left_up_x = max(x1, x3)
    left_up_y = max(y1, y3)
    right_down_x = min(x2, x4)
    right_down_y = min(y2, y4)

    width = right_down_x - left_up_x
    height =  right_down_y - left_up_y

    return width * height
## 파일을 생성 해냅니다.
for _12 in range(1000): #원하는 장수를 입력
filename = 'data_'+''.join(str(rd.random()*10).split('.')) #랜덤한 이름의 파일 생성.
if not os.path.isdir('data/train/'):
os.makedirs('data/train/')
f = open('data/train/'+filename+".txt", 'w',encoding='UTF-8') #파일 label값을 저장할 txt파일입니다.
tmp = []
backgroundSet() #흰색 배경 세팅
for _ in range(20): #한 바탕에 20개의 카드를 넣도록 시도합니다.
selected = rd.choice(cards) #랜덤으로 카드선택
card = target(pathBuild(path,selected)) #선택한 카드를 준비,
gyup = []
#tmp 리스트를 확인 합니다. 만약 겹치는 문자가 있다면 다음 if문이 작동하지 않습니다.
for loc in tmp:
if georee(loc,card.getlocation()) !=0:
gyup.append(False)
else:
gyup.append(True)
# all() 입력된 iterable 중 하나라도 False면 False, and
if all(gyup) :
img.paste(card.image,card.getlocation())
tmp.append(card.getlocation()) #그려지는 문자의 위치를 반환합니다.
x1,y1,x2,y2 = card.getlocation() #카드의 좌상단과 우하단을 받아 중간과 폭, 높이를 게산합니다.
w = x2 - x1
h = y2 - y1
cx = int((x1+x2)/2)
cy = int((y1+y2)/2)
rs = [cx,cy,w,h]
print(str(charset.index(card.value.split('.')[0])), card.value.split('.')[0])
line = str(charset.index(card.value.split('.')[0])) +' '+ ' '.join([ str(i/1000) for i in rs])+'\n' #labeling 합니다.
f.write(line)
f.close()
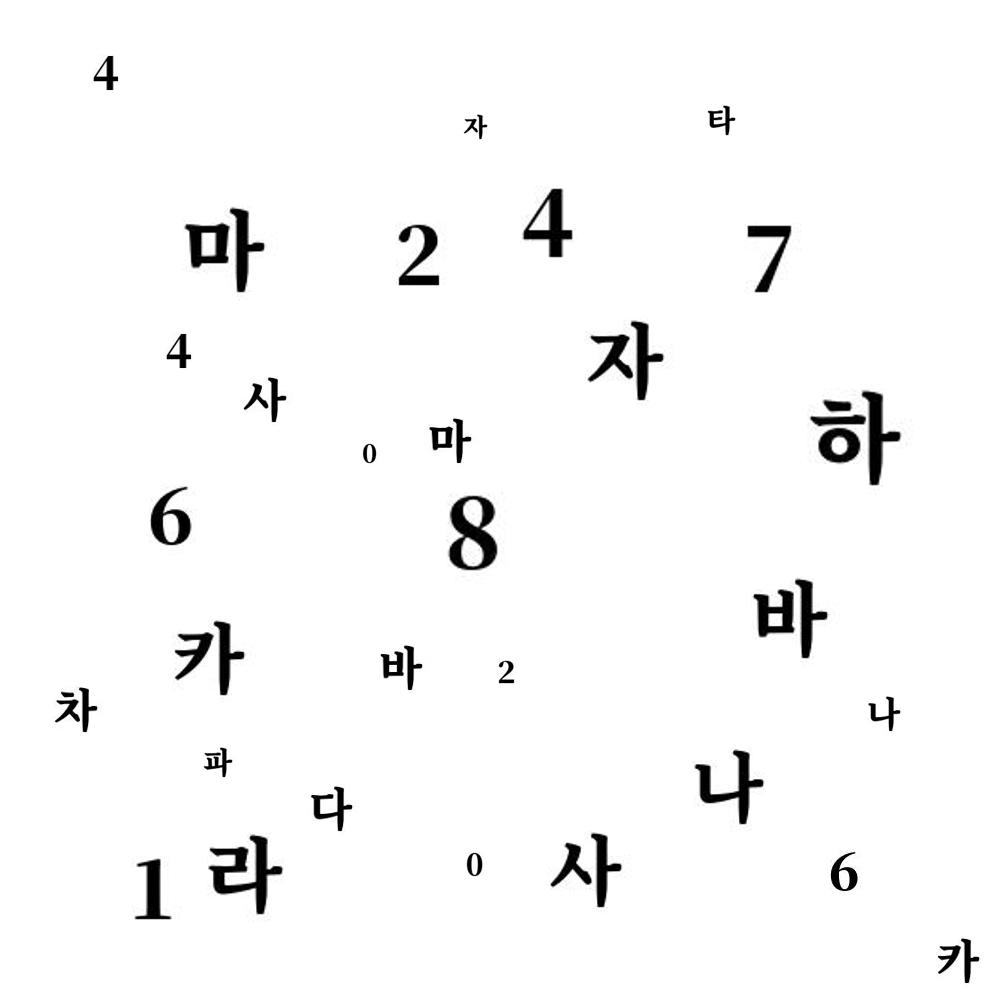
img.save('data/train/'+filename+".jpg")보드를 생성합니다. 카드를 랜덤으로 불러와 랜덤으로 크기, 위치를 정하고, 겹치는 경우 다시위치를 잡습니다.
또한 모든 카드들의 위치를 저장해 저장되는 board 이미지와 같은 이름으로 text 파일에 넣습니다.
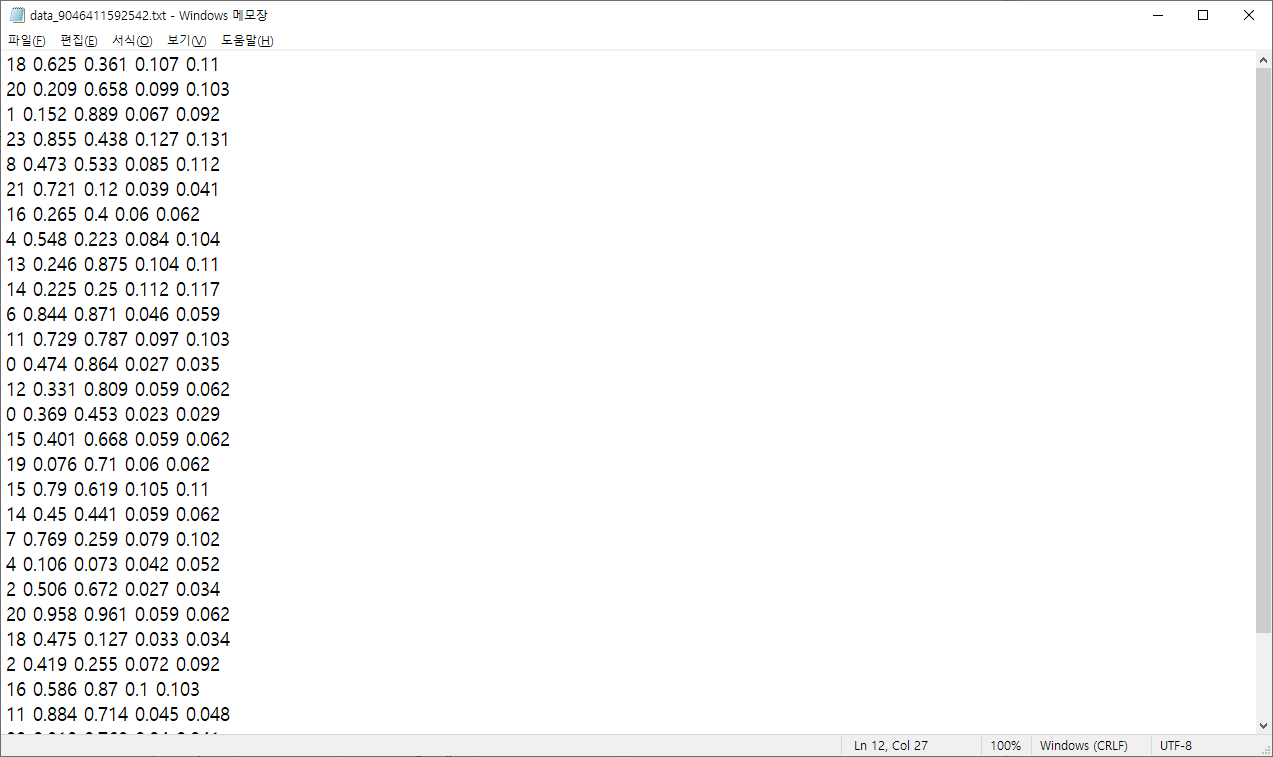
텍스트 파일은 다음과 같이 생성 됩니다. 한줄에 박스 하나씩이며 모든 항목은 띄어쓰기로 구분 됩니다.
쉼표가 들어가면 안됩니다.
각 항목은 다음과 같습니다.
| class No | Center x | Center y | Width | Height |
| 18 | 0.625 | 0.361 | 0.107 | 0.11 |
해석)
전체 클래스 24개중(0~23) 18번째 값,
중심좌표를 받으며 그 값은 이미지 크기의 상대값 배경이 1000px이므로 중심좌표(Center x, Center y) = 625,361
박스의 폭과 높이를 받으며 그값또한 상대값 가로 107px, 세로110px
1-4 train.txt validation.txt
import random as rd
import os

files = os.listdir('data/train')
rd.shuffle(files)

files = ['/content/data/train/'+i for i in files]

len(files)

f = open("data/train.txt", 'w',encoding='UTF-8')
f1 = open("data/validation.txt", 'w',encoding='UTF-8')
count = 0
for file in files:
    if file.split('.')[-1] =='txt':
        pass
    else:
        if count <= len(files)*0.4:
            f.write(file+'\n')
        else:
            f1.write(file+'\n')
        count +=1

f.close()
f1.close()
생성된 이미지들을 8:2 비율로 나누어 txt 파일에 저장합니다. 추후 mAP계산을 위해 필요합니다.
1-5 .cfg 파일 설정.
cfg 파일은 darknet 내부의 yolov4-custom.cfg 파일을 수정하여 사용하겠습니다. 학습에 필요한 파라미터들을 수정할 수 있습니다.
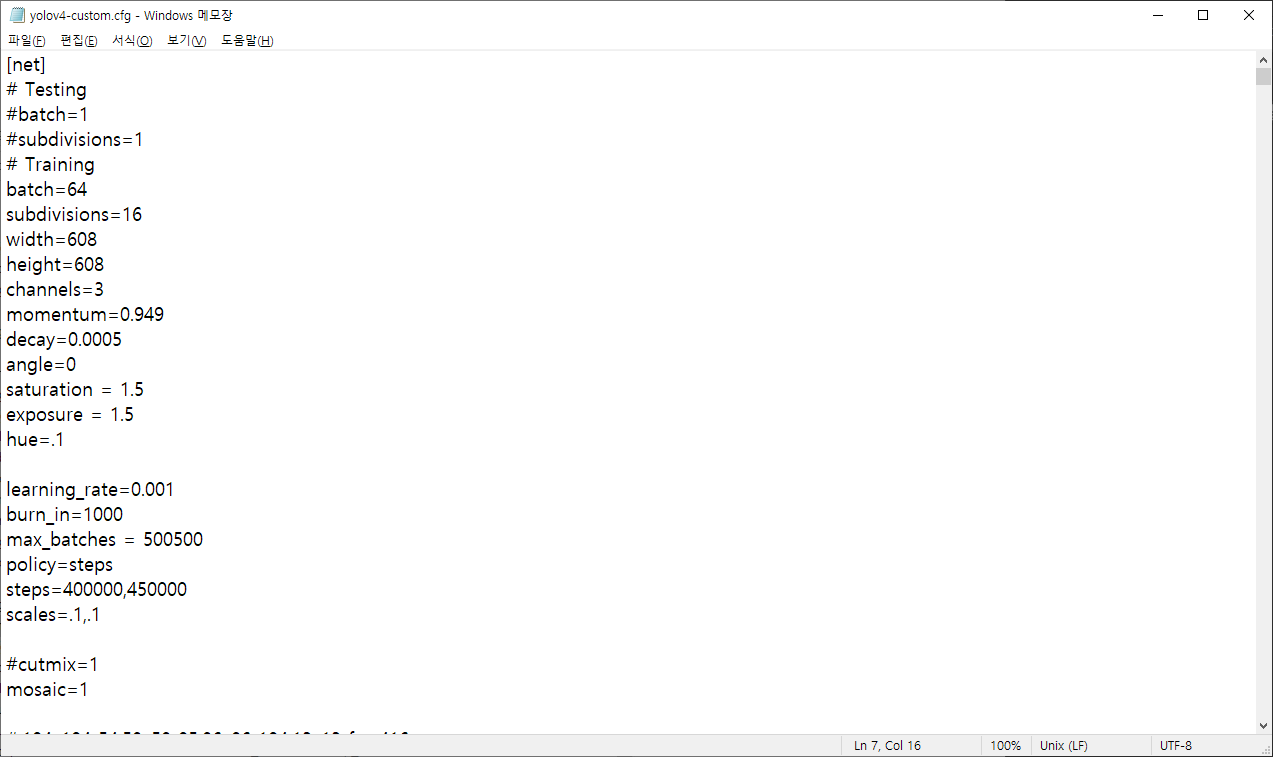
darknet/cfg 폴더 안쪽에 무수한 cfg 파일이 있으며 그중 custom 파일을 골라서 열어 줍니다. 다음 항목들을 수정합니다.
- batch : 한번에 학습되는 이미지의 양을 정합니다. 보통 2의 제곱수로 설정하며 그래픽카드의 Vram이 높을 수록 높게 설정할 수 있습니다.
- subdivisions : batch를 어떻게 나눠서 학습할것인지 정합니다.
예시) batch =64 , subdivisions =64일 경우
64장의 이미지를 한장씩 불러와 iteration 구성
batch =64 , subdivisions =16일 경우
이미지를 64/16 = 4 장씩 loss 계산 , 4장씩묶으므로 Vram 사용량 증가.
⁕⁕정확한 해설이 아닐수도 있습니다. 느낀점만 적어놓는 거라...
눈물나는 1050 4G 기준 4/4도 간신히 돌렸습니다.
- width : 이미지 폭, 설정시 자동으로 리사이즈
- height : 이미지 높이 설정시 자동으로 리사이즈
width, height 는 크게하면 검출이 잘되지만 그만큼 크기도 늘어나 batch 사이즈에 영향을 주게 됩니다.
- burn_in : 학습률을 서서히 높여가며(설정치 만큼) 학습을 진행 합니다,
- max_batches : 최대 iteration 값을 정합니다.
- steps : 일반적으로 max_batches의 80,90% 로 정합니다. 해당 단계에 도달시 학습률을 크게 합니다.
도움이 될만한 글)https://stackoverflow.com/questions/50390836/understanding-darknets-yolo-cfg-config-files
Understanding darknet's yolo.cfg config files
I have searched around the internet but found very little information around this, I don't understand what each variable/value represents in yolo's .cfg files. So I was hoping some of you could hel...
stackoverflow.com
상단부를 고친뒤 하단부를 고쳐야 합니다.
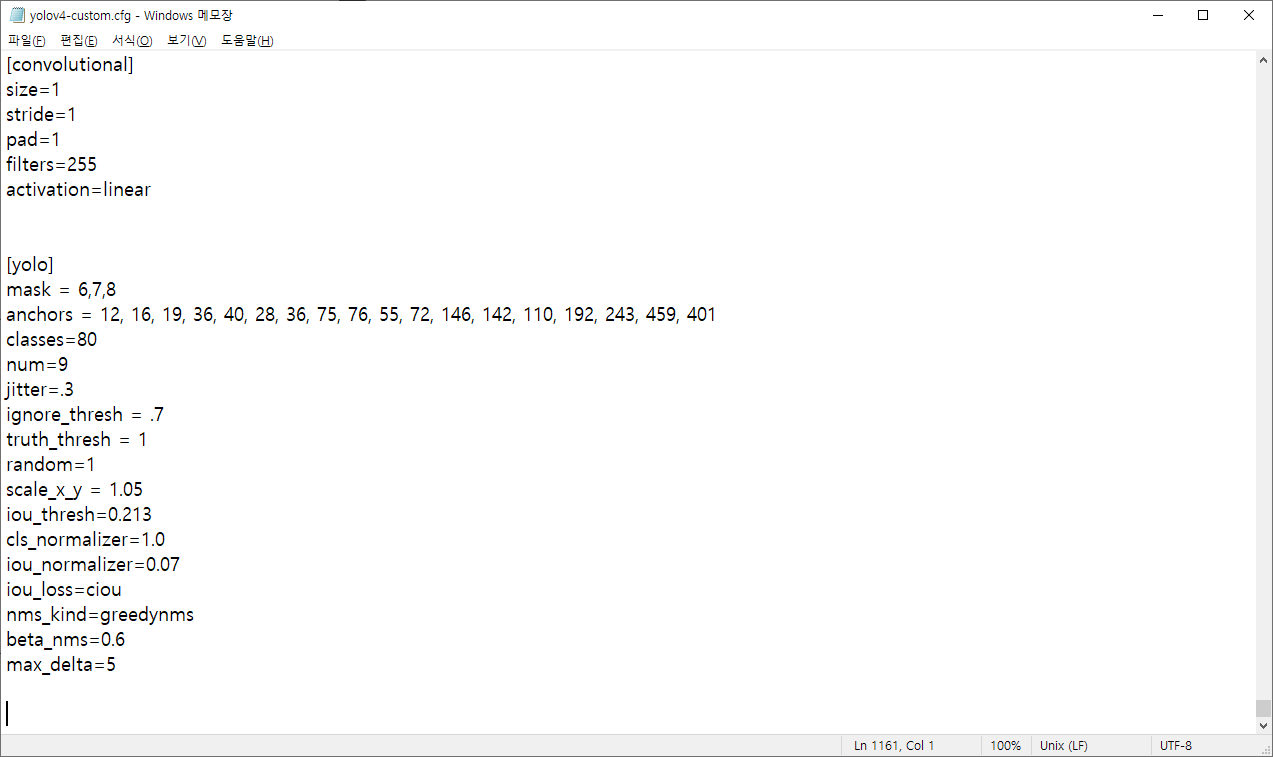
[yolo] 라 되어있는 부분 아래의 classes를 자신이 설정하는 classes로 바꾸고 바로 위 [convolution]의 filter를 수정합니다.
classes = 24
filter = 87 #(classes+5)*3
.cfg 파일 아래쪽에 3군데 존재하며 전부 바꾸어야 합니다.
1-6 obj.names and obj.data
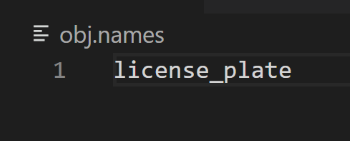
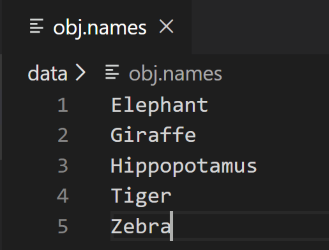
obj.names는 이미지와 같이 class의 라벨이 들어갑니다. 주의할점은 띄어쓰기가 들어가선 안되며 한줄에 한class씩입니다.
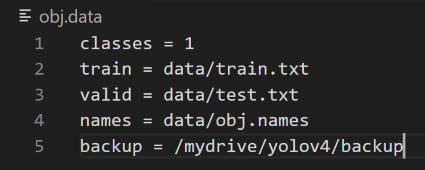
obj.data에는 지금까지 만든 파일들의 경로를 적어 학습에 사용되도록 전달합니다.
data = '''classes = 1
train = data/train.txt
valid = data/validation.txt
names = data/obj.names
backup = /mydrive/yolo_backup'''

obj_data =open('data/obj.data','w',encoding='utf-8')

obj_data.write(data)

obj_data.close()
data = '''가
나
다
라
마
바
사
아
자
차
카
타
파
하
0
1
2
3
4
5
6
7
8
9'''
obj_data =open('data/obj.names','w',encoding='utf-8')
obj_data.write(data)
obj_data.close()
1-7 anchors 계산.
./darknet detector calc_anchors ../data/obj.data ../data/yolo_test.cfg -num_of_clusters 9 -width 608 -height 608
darknet으로 돌아와 위 command로 anchor를 계산해 줍니다.
anchor는 박스들의 평균을 구해 원활한 학습이 되도록 한다고 합니다.
만약 계산이 되지 않으면 다음과 같은 사항을 확인해 봐야 합니다.
- cfg 파일 내부 항목 중 단일항목에 쉼표(,)가 찍힘
- label 텍스트 파일 내부에 쉼표(,)가 찍힘
계산결과가 나왔다면 .cfg 파일 내부 하단 3군데의 anchors 값을 바꿔 줍니다.
1 - 8 사전학습 모델 가져오기,
wget https://github.com/AlexeyAB/darknet/releases/download/darknet_yolo_v3_optimal/yolov4.conv.137
필요할 경우 사전에 학습된 모델을 가져와 학습 성능을 높일 수 있습니다.
2. 진짜 학습 시작.
다음 command로 학습을 시작합니다.
./darknet detector train ../data/obj.data ../data/yolov4-custom.cfg yolov4.conv.137 -map
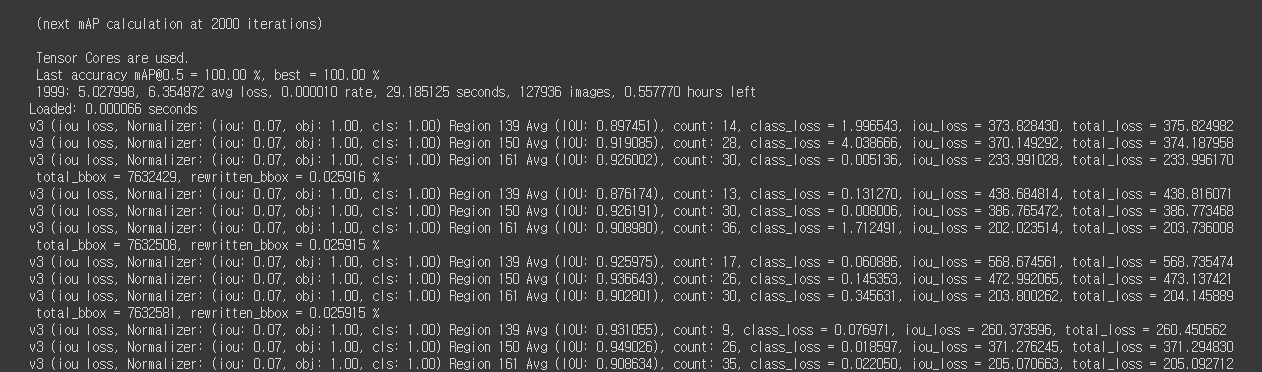
-map 를 추가해 주어야, 중간중간 mAP계산 결과를 확인 할 수 있습니다.
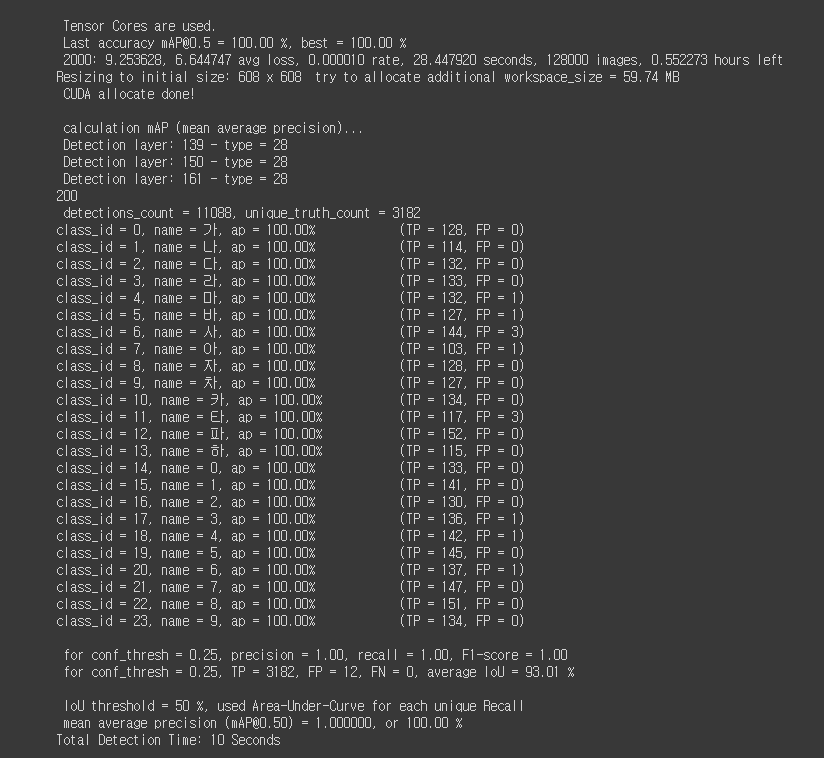
학습시 iteration과 mAP 계산 예시,
학습과정중 문제가 발생하여 끊길경우 다음 command로 이어서 학습 할 수 있습니다.
./darknet detector train ../data/obj.data <백업 weights 파일> -map
학습시 iou 값이 0.00으로 떨어진다면 학습을 멈추고 다시 진행해야 합니다.
학습은 loss 값이 더이상 떨어지지 않을 때까지 진행하며 권장수는 classes * 2000 입니다.
3. 학습 완료.
학습완료시 yolov4-custom_best.weights, yolov4-custom_final.weights, yolov4-custom_last.weights, 그리고 학습상황에 맞은 yolov4-custom_XXXX.weights 파일들이 backup으로 지정한 폴더에 생성됩니다.
./darknet detector map ../data/obj.data ../data/yolov4-custom.cfg /mydrive/yolo_backup/yolov4-custom_best.weights
각 weights마다 mAP를 게산하여 가장 잘학습된 파일을 사용하면 됩니다.
4. 추론.
아래 커맨드와 같이 결과를 추론할 수 있습니다.
./darknet detector test ../data/obj.data ../data/yolov4-custom.cfg /mydrive/yolo_backup/yolov4-custom_best.weights ../b0.jpg -thresh 0.6
-thresh
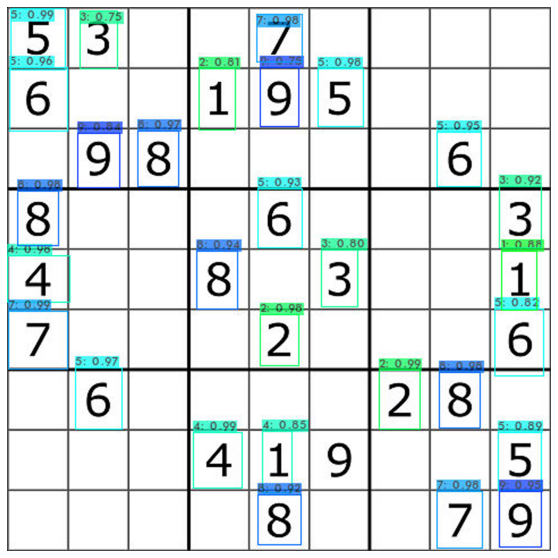
스도쿠 판을 넣은 결과 몇몇 숫자들이 제대로 학습되지 않음을 확인할 수 있습니다.
원인은 다음과 같습니다.
- 폰트 사용의 문제, 다양성을 주지 않으면 약간의 차이만으로 다른 것으로 감지해 버립니다.
- 절대적 학습량 미달, 권장 iteration은 24*2000으로 48000회 정도이지만, 시간상 2000회에서 마무리한 결과입니다.
- 실제 학습이미지와 다름.
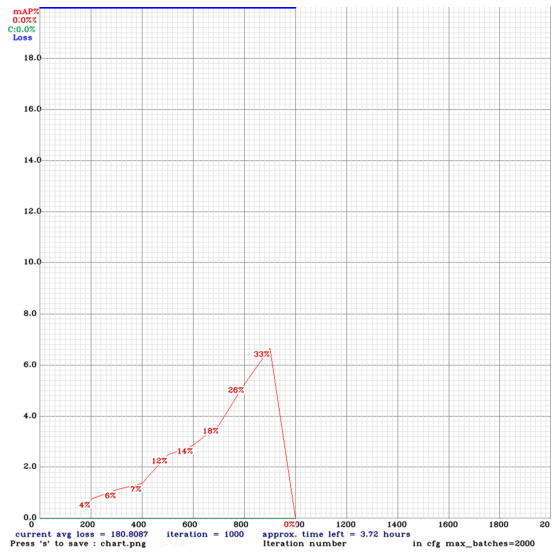
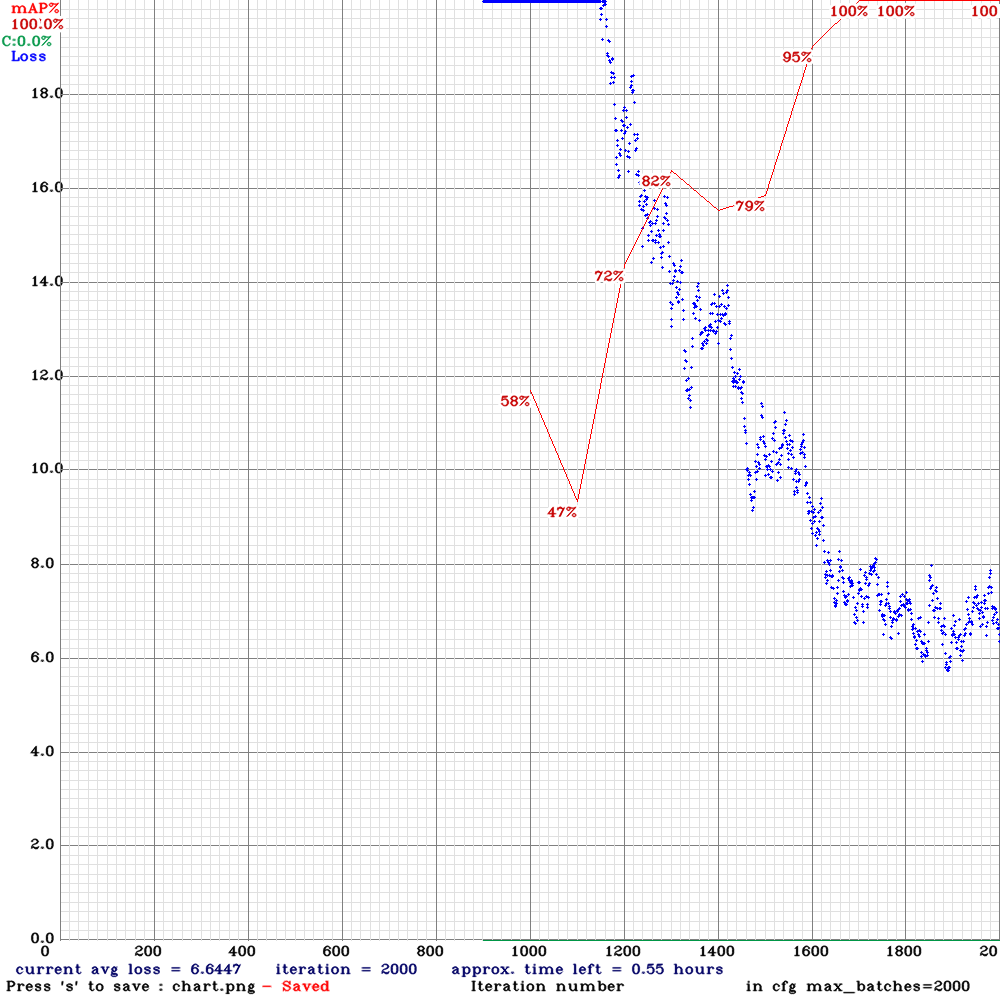
학습 완료시 darknet 폴더 안쪽으로 chart.png 파일이 생상되어 학습 과정을 볼 수 있습니다.
학습차트
도움이 된& 될것같은 문서
https://zeuseyera.github.io/darknet-kr/11_SaYongBeob/SaYongBeob_Yolo-v3.html
darknet-kr
:kr: 다크넷(darknet): C로 작성한 신경망 공개소스
zeuseyera.github.io
https://stackoverflow.com/questions/50390836/understanding-darknets-yolo-cfg-config-files
Understanding darknet's yolo.cfg config files
I have searched around the internet but found very little information around this, I don't understand what each variable/value represents in yolo's .cfg files. So I was hoping some of you could hel...
stackoverflow.com
https://jjeamin.github.io/darknet_book/part1_paper/yolov4.html
YOLOv4 · DarkNet Book
Bag of Freebies for detector : CIoU, CmBN, DropBlock, Mosaic, Self Adversarial Training, Eliminate grid sensitivity, Using multiple anchors for a single ground truth, Cosine anneling scheduler, Optimal hyper parameters, Random training shapes
jjeamin.github.io
The AI Guy
Hi Everyone! I am the AI Guy and I'm extremely motivated to teach everyone I can about machine learning and AI. I post AI videos about everything AI! Currently in love with Object Detection and Computer Vision.. Let me know what type of videos you all woul
www.youtube.com
YOLOv4_Training_Tutorial.ipynb
Colaboratory notebook
colab.research.google.com
위 colab을 번역/ 이번 블로그의 내용을 반영한 colab
Google Colaboratory Notebook
Run, share, and edit Python notebooks
colab.research.google.com
질문거리는 댓글로 주세요
'Back > Deep Learning' 카테고리의 다른 글
| [YOLOv4][Darknet] 빌드 및 예시 (0) | 2021.05.12 |
|---|---|
| [DL] 그래픽카드 Deep Learning bench Mark (0) | 2021.04.27 |
| [OCR]TESSERACT OCR 4.0 LSTM 학습. (1) | 2021.01.25 |
| [Python][Keras ][Tensorflow] Keras 모델 TFlite 변환과 최적화 (0) | 2020.11.04 |
| [Tensorflow] Image classification model maker예측하기. (2) | 2020.10.20 |


